Information on "How to cape out your hide"
and "How to care for it".
| The outcome of any mount is determined from the moment the animal is dispatched, and how you care for it has a great bearing on the final outcome.
Always treat the hide as you would treat the meat. (If the meat would spoil, chances are so would the hide.)
Keep it cool and dry as possible at all times.
Never enclose it in a plastic bag unless you are freezing it immediately. If you freeze it, double plastic bag it to avoid freezer burn and dehydration. For mammals always have at least 20 lbs. of fine salt at your disposal.
Know how to cut and cape your animal. Study these instructions even if your guide or outfitter is caping your animal. If he is doing it incorrectly dont be afraid to inform him of how your taxidermist prefers it to be done.
A CAPE is what a taxidermist calls the skin used in a mount. A HIDE is the remainder of the skin. Caping an animal is quite simple if it is done systematically. I prefer to make all my cuts first then they are symmetrical. It is better to have too much cape than too little, especially for the new pedestal mounts. Never cut the throat, once an animals heart stops, bleeding is very ineffective. If you must cut the throat cut it with the grain of the hair and sever the jugular, however (this is not recommended) before caping or skinning an animal there are measurements necessary for shoulder mounts. Use a 1/4 inch steel tape |
| SKETCH 1--------------------------SKETCH 1A |
MEASUREMENTS |
 |
1. From the front corner of the eye to the tip of the nose #1 to #2 on sketch 1.
2. Tip of the nose to the base of the skull. #2 to #3 on sketch 1.
3. Circumference of the neck behind the ears. (pull the tape snug) #4 on sketch 1. For life-size, add these measurements:
Circumference around the chest, #5 on sketch 1
Overall length from the tip of the nose to the tail, #6 on sketch 1.
|
| SKETCH 2 |
SKETCH 2 |
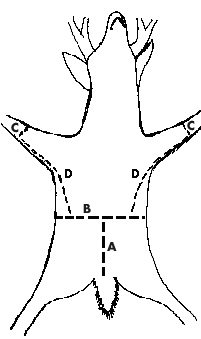 |
A. On horned or antlered animals, cut from the vent to the sternum or beginning of the rib cage (if you cut into the brisket it will require a repair).
B. Cut around the animal. At least half way back.
C. Cut around the legs at least 8 inches down.
D. Cut down the back of the legs, you will usually see a hair line. Never cut into the arm pit area.
E. Cut up the center of the back of the neck from B cut to the base of the skull. (See sketch 1A) All areas can now be skinned and released and the neck meat severed from the skull. Warning- If the neck meat is left in; the hide cannot cool out nor be salted and will most likely spoil. When laid hair side up the cape should look like the photo of the cape at the top of the page.
F. Remove all meat from the skin side of the cape and or hide. Skin up under the hide of the head as far as possible without fully skinning the head. Apply salt to the skin side of the cape and or hide, force salt up around the head as far as possible. Let the cape and or hide drain for 1 to 2 hours and re-salt. This should be good for several days unless the weather is very warm, then the option of Caping the face should be exercised. (See G H & I). Always keep the cape and or hide cool and never put it in a plastic bag. An extra deer bag or burlap sack will keep flies out of the nose, mouth, ears and eyes. This should be good in moderate weather for a couple of days, but get it to us as soon as possible. (see shipping)
|
| OPTIONAL: CAPING THE FACE |
G. Make a Y cut to the base of the horns or antlers. (See sketch 1A)
H. Sever the ear butts at the ear canal next to the skull.
Carefully cut the skin around the horns or antlers. (It is important to be careful any skin left on the horn or antler is lost.) Carefully skinning forward, you will come to the eye socket. Dont cut the corner of the eyes. With your finger in the eye socket pull on the skin and remove the eye ball leaving it attached to the skin. At the front corner of the eye drop into the tear duct socket and release the skin. Continue forward, cutting the inside of the mouth skin leaving at least one inch of interior mouth skin attached to the cape. Cut loose the nose cartilage leaving it attached to the skin. Salt all interior skin, fold the ears inside the salted skin and roll up the skin. After 1 or 2 hours drain and re-salt. |
| RUG SKETCH 3 |
FOR LIFE-SIZE ANIMALS OR RUGS. |
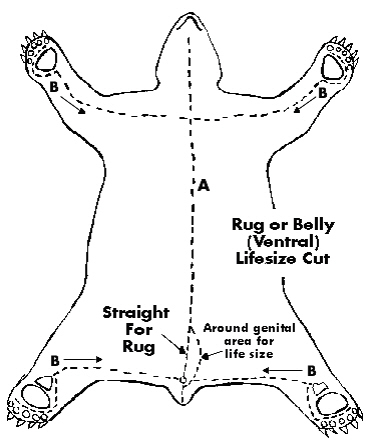 |
Position the animal on its back and make all your cuts first to insure symmetry. For rugs or frontal life-size cuts see sketch 3 and 4. A. Cut from 2 inches below the chin straight down through the anus and up the center of the tail for a rug or flat tanned hide. For a life-size, detour your cut around the genitals and anus.
B. Starting at the pad or hoof, cut toward the center of the animal and straight across. The feet can be detached at the ankle and we will skin them or cut around the pads and lay them open to skin the feet to the base of the claws. Detach the skull at the atlas vertebrae which attaches to the base of the skull. When shipping frozen, leave the feet and skull in. Always remove all meat from the skin and salt the skin side. Drain, after 1 to 2 hours re-salt. In extremely warm weather, skin the head out per caping instructions (see optional G, H & I) and skin feet and salt all skin areas. Regardless of whether you salt the cape or hide or not, always freeze before shipping. See shipping instructions.
|
| OPTIONAL LIFE SIZE CUT SKETCH 4 |
|
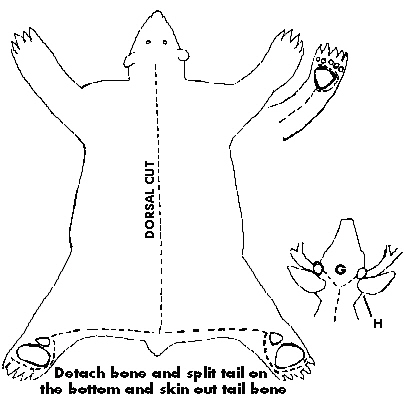 |
On life-size animals a back or dorsal cut can be advantageous so that the stitches don't show in short hair areas. (i.e. belly & armpit) Tube the front legs but split from the elbow to the pad. Cut around the pads splitting the hairline. On antlered or horned animals do a "Y" cut. |
SHIPPING INSTRUCTIONS:
Always call us before shipping. All items shipped to us should be skinned and frozen or skinned with lips, eyes and nose split, all flesh removed and salted. PUT CAPE OR HIDE in a plastic bag lined box and stuff crumpled newspaper around the item for insulation, seal and mark perishable and ship by fastest means of transportation. For further information, please call us.